FLUX Erase is a free AI object removal tool from Black Forest Labs (the team behind the FLUX family of AI image generation models) that removes masked objects, erases text, and reconstructs the missing background.
Manual retouching with clone stamps and content‑aware fill takes time, practice, and a careful eye. FLUX Erase collapses that work into seconds. Shadows, partial occlusions, and design‑level details such as text on packaging disappear along with the masked region.
Use FLUX Erase when you need a quick AI eraser for product photos, text removal, privacy edits, and small distracting details. Skip it when you need a full photo editor, batch cleanup, local processing, or a self-hosted open-source workflow.
Features
- Removes the masked region and reconstructs the scene background in a single model call.
- Automatically detects and removes related visual artifacts such as shadows and reflections left by the erased object.
- Accepts images via drag and drop, file upload, or clipboard paste.
- Adjustable brush size from 5px to 150px for precise or broad masking.
- Supports Ctrl+Z / Cmd+Z undo for stroke corrections before submission.
- Available as a REST API for developer integration.
My Test
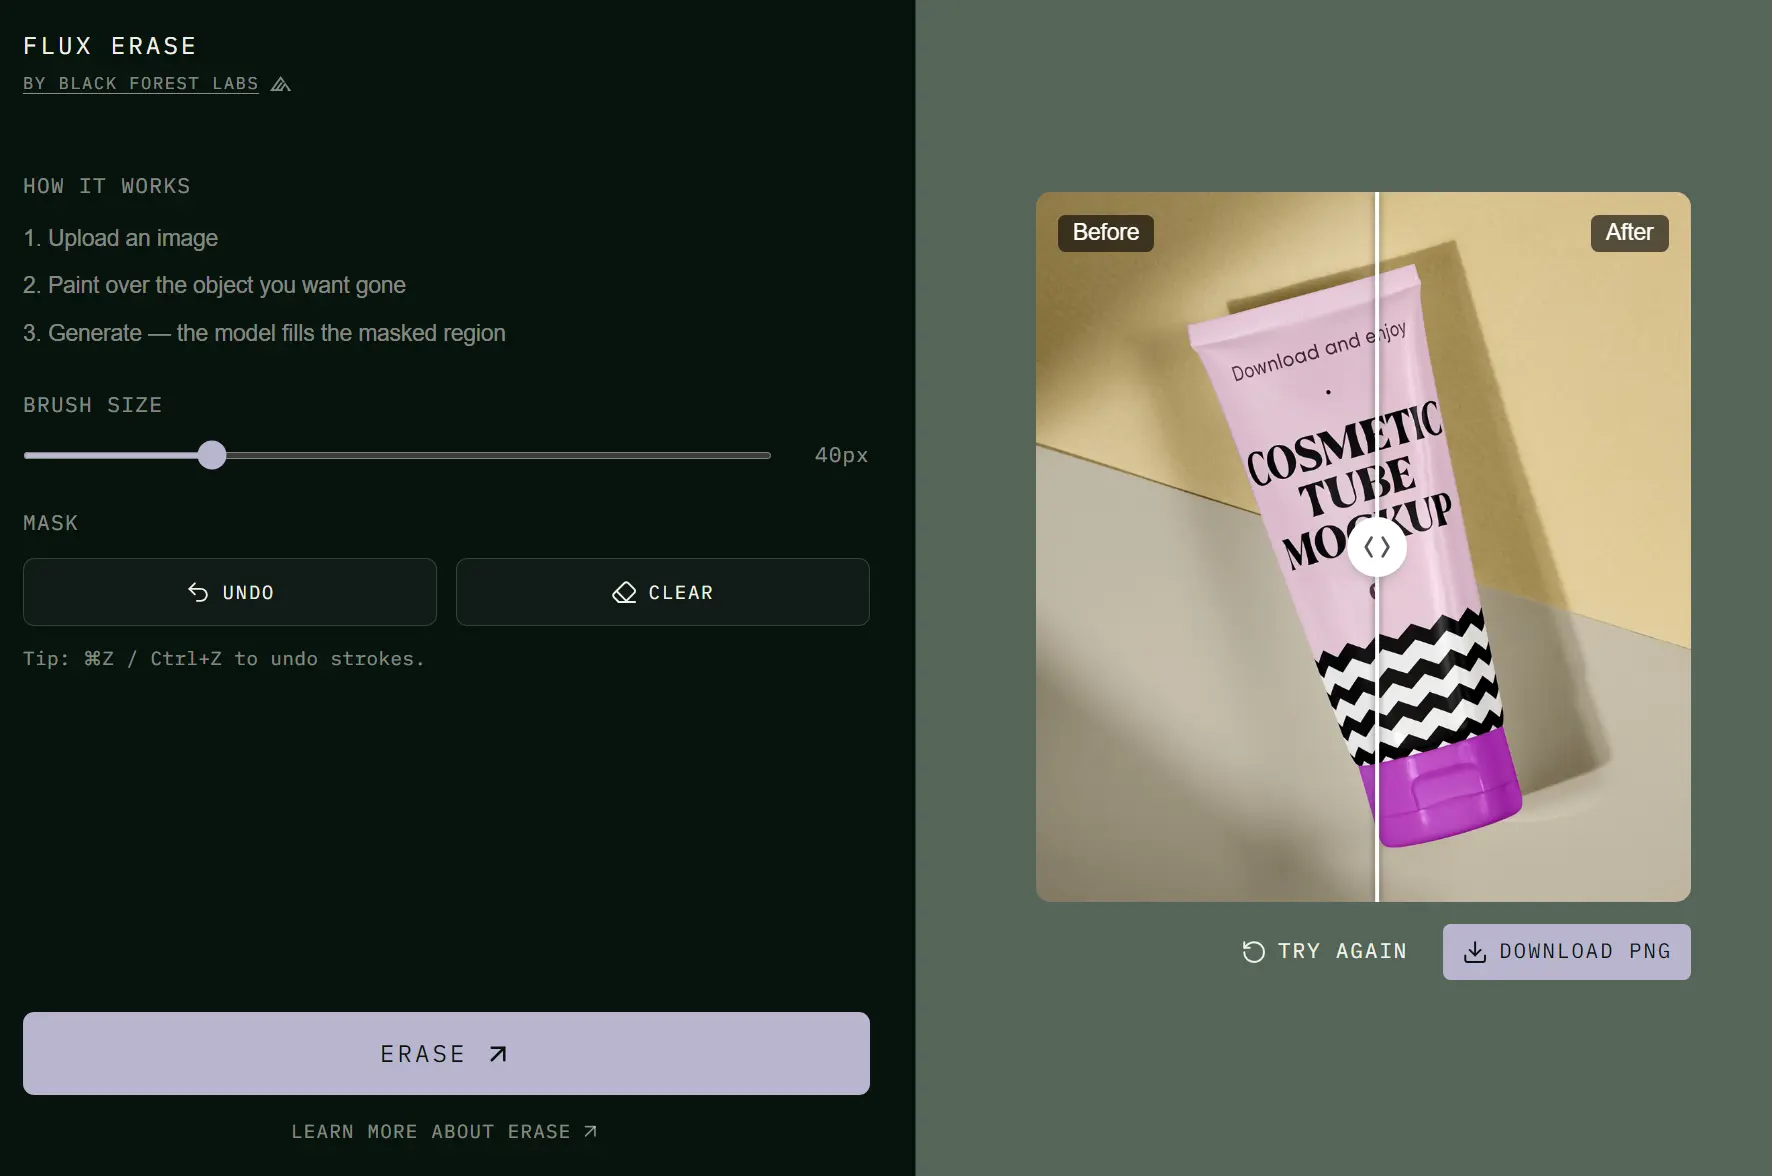
I ran FLUX Erase on a product image of a cosmetic tube. The goal was to remove the word “BEE” printed on the packaging. I used the brush tool to paint over the text, adjusted nothing else, and clicked Erase.
The removal finished in under three seconds. The AI filled the area with the packaging’s background color and texture. No visible seam, no blurred patch, no halo around where the text sat. The surrounding label design stayed intact.


Use Cases
- Clean text overlays, watermarks, and labels off product photography before publishing to a store or catalog.
- Remove a person, object, or prop from a scene image for marketing reuse.
- Strip distracting background elements from a photo to focus the composition.
- Anonymize or privacy-edit images by erasing identifiable details before sharing.
- Prototype scene simplifications for design mockups or client presentations.
How to Use FLUX Erase
1. Visit the FLUX Erase tool and upload an image from your device. You can drag and drop an image, click to choose a file, or paste an image from your clipboard.
2. Paint over the object, word, mark, or detail that you want to remove.
3. Adjust the brush size from 5px to 150px based on the object size. Use a smaller brush for text and tight edges. Use a larger brush for bigger objects.
4. Click the “ERASE” button.
5. Review the filled area before you download or reuse the image.
6. Use ⌘Z on Mac or Ctrl+Z on Windows to undo brush strokes before processing.
7. FLUX Erase is available as an API endpoint for developers. The API accepts an image and an erase mask and returns the reconstructed result in a single call.
Pros
- No account or sign-up required.
- Clean background reconstruction.
- Simple masking workflow.
- Fast one-off edits.
- API access.
- PNG, JPEG, and WebP support.
Cons
- No self-hosting.
- API needs credits.
- Manual masking required.
Alternatives
- Free Local AI Photo Editor for Mac – AIvory
- 10 Best & 100% Free AI Image Background Remove Tools
- Free AI Watermark Remover That Runs Locally – Clean PicGo
More Free AI Tools from Black Forest Labs
- FLUX VTO: Free AI Virtual Try-On With Developer API
- FLUX Outpainting: Free AI Outpainting Tool for Social & Product Images
- Precise Editing: Pixel-level AI Image Editing Tool by FLUX 3 Image
- FLUX 3 Image Klein: Free Online AI Image Generator & Editor
FAQs
Q: Is FLUX Erase free?
A: The web demo is free to use with no account required. API usage is subject to Black Forest Labs pricing.
Q: What types of content can FLUX Erase remove?
A: It removes objects, text, logos, watermarks, and other details you paint over with the brush. It also automatically removes associated shadows.
Q: How does FLUX Erase fill in the background?
A: The model reconstructs the masked region using the surrounding scene context in a single pass. It does not use a two-step remove-then-fill approach; the erasure and reconstruction happen together at the model level.
Q: What is the best use case for FLUX Erase?
A: FLUX Erase works best for removing unwanted objects, text, marks, and small distractions from images where the surrounding area gives enough context for reconstruction.
Q: Does FLUX Erase add a watermark to the output?
A: No watermark is added to the processed image.