Kimi Code CLI is a command-line AI coding agent that integrates AI capabilities directly into your terminal environment.
It’s an open-source CLI tool from Moonshot AI, the creators of the Kimi large language model. This means it’s finely tuned to work well with their powerful models.
Kimi CLI is currently in a technical preview, so you can expect more features to be added over time.
Features
- Dual Mode Operation: Switch between shell mode and agent mode instantly by pressing
Ctrl+K. In shell mode, you get a standard terminal with the dollar sign prompt where commands execute normally. In agent mode, the AI assistant takes over to help with coding tasks. - Agent Client Protocol Support: Full compatibility with ACP means Kimi CLI integrates into Zed’s agent panel and other ACP-compatible editors. You can create threads directly in your editor and review changes with syntax highlighting.
- Zsh Integration Plugin: Install the
zsh-kimi-cliplugin through Oh My Zsh to add AI agent capabilities to your existing Zsh workflow. PressCtrl+Kfrom your regular shell to activate agent mode without leaving your terminal. - Model Context Protocol Compatibility: Connect to MCP servers using a JSON configuration file. Point Kimi CLI to your MCP config with the
--mcp-config-fileflag to access MCP servers like Chrome DevTools or custom search servers. - Shell Command Execution: The tool actually runs as a functional shell, not just an AI wrapper. You can configure it as your default shell that opens automatically when launching your terminal.
- Context Management Commands: Built-in slash commands help you manage context windows. Use
/compactto summarize context up to that point,/clearto reset the terminal output, and/debugto see logs of all messages and current context.
Use Cases
- Multi-File Refactoring Projects: When you need to refactor code across multiple files, Kimi CLI can plan the changes and apply patches file by file. You maintain visibility of what’s changing while the agent handles the mechanical work of updating each location.
- Debugging Complex Issues: The tool excels at analyzing error messages, examining stack traces, and suggesting fixes. The
/debugcommand shows you exactly what context the agent has, helping you understand its reasoning process. - Terminal Workflow Automation: Developers who spend significant time in the terminal can keep Kimi CLI running and switch to agent mode whenever they hit a snag. No need to context-switch to a browser or separate application.
- Planning Before Execution: Ask for a detailed plan before implementing changes. The agent can outline the approach, identify potential issues, and get your approval before touching any code. This “plan-then-edit” workflow reduces mistakes.
- Tool-Assisted Development: Connect MCP servers for linters, search capabilities, or filesystem operations. The agent can request these tools, analyze their output, and make decisions based on the results.
How to Use It
1. To get started, you first need Python 3.13+ and UV installed on your system. UV is a Python package installer that Moonshot AI recommends for managing Kimi CLI. Visit the UV documentation site to install it if you don’t have it yet.
2. Install Kimi CLI by running uv tool install --python 3.13 kimi-cli in your terminal. The first run on macOS might take 10 seconds or longer because of security checks that Apple runs on new executables.
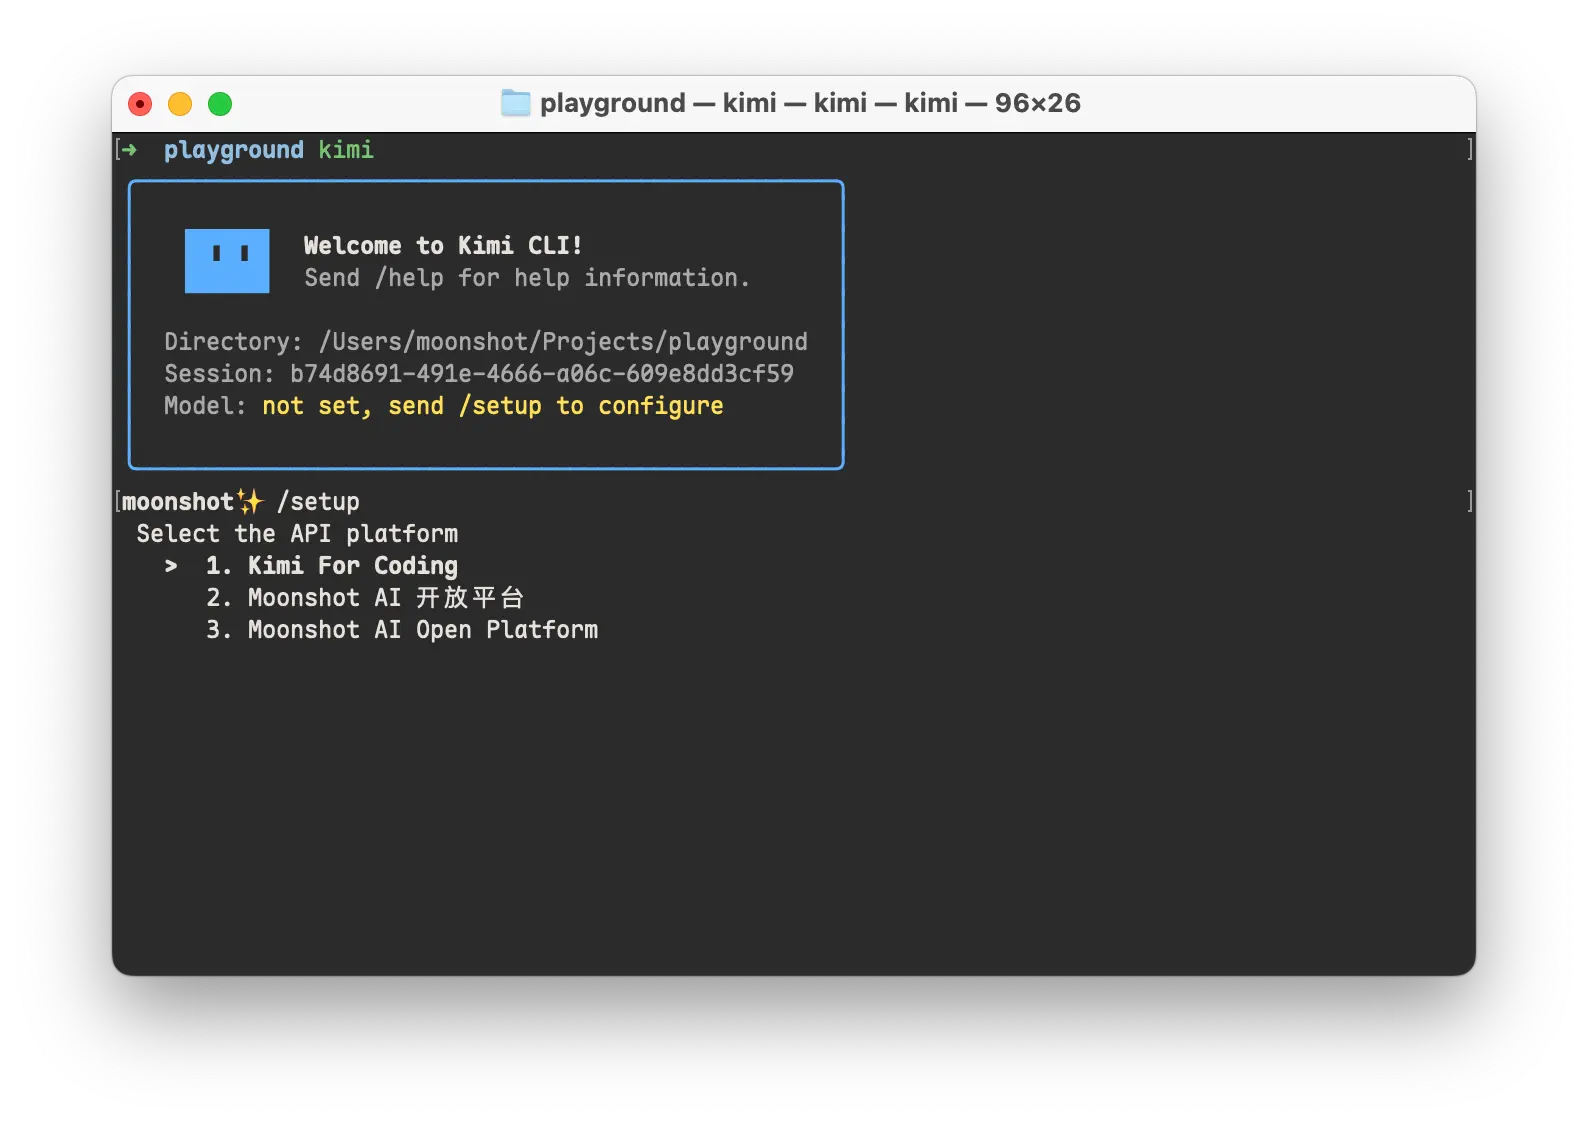
3. Launch Kimi CLI by typing kimi in your project directory. Send the /setup command to configure your installation. The setup process asks you to choose between the Kimi coding plan or the Moonshot general API. If you’re using the coding plan, go to your Kimi account settings, find the Subscription section, and locate the “Kimi for coding” option. Copy the API key shown there and paste it into the setup prompt.
4. After setup completes, use /help to see available commands and features. Press Ctrl+K to switch to shell mode for running regular commands, then press Ctrl+K again to return to agent mode when you need AI assistance.
5. For Zsh integration, clone the zsh-kimi-cli repository into your Oh My Zsh custom plugins directory with:
git clone https://github.com/MoonshotAI/zsh-kimi-cli.git \
  ${ZSH_CUSTOM:-~/.oh-my-zsh/custom}/plugins/kimi-cli
Edit your ~/.zshrc file to add kimi-cli to the plugins list. Restart your shell and the Ctrl+K binding will work from your regular Zsh prompt.
6. To set up editor integration with Zed, add this configuration to ~/.config/zed/settings.json under the agent_servers section:
{
  "agent_servers": {
    "Kimi CLI": {
      "command": "kimi",
      "args": ["--acp"],
      "env": {}
    }
  }
}
Open Zed’s agent panel and you can now create Kimi CLI threads directly in the editor.
7. For MCP server support, create a JSON file with your mcpServers configuration, listing each server’s connection details.
{
  "mcpServers": {
    "context7": {
      "url": "https://mcp.context7.com/mcp",
      "headers": {
        "CONTEXT7_API_KEY": "YOUR_API_KEY"
      }
    },
    "chrome-devtools": {
      "command": "npx",
      "args": ["-y", "chrome-devtools-mcp@latest"]
    }
  }
}
Run kimi with --mcp-config-file /path/to/your/config.json to connect to those servers at startup.
8. Upgrade Kimi CLI manually:
uv tool upgrade kimi-cli --no-cache
Kimi CLI vs. Claude Code or Cursor
Kimi CLI shares similarities with Claude Code in that both are terminal-based coding agents, but Kimi CLI is specifically tuned for the Kimi K2 model. Cursor is a full IDE fork while Kimi CLI is a lightweight command-line tool.
Kimi CLI’s main advantages are its open-source nature, tight integration with Kimi models, and dual shell/agent mode.
If you’re already using Kimi models or prefer working primarily in the terminal, Kimi CLI is worth trying. If you need a full IDE experience, Cursor might be better.
Pros
- Free and Open-Source: You can use it without any cost, and the source code is available for anyone to inspect or modify.
- Powerful AI Model: It’s backed by Kimi’s one-trillion-parameter model, which is very capable when it comes to coding and reasoning.
- Dual Functionality: The ability to switch between a shell and an AI agent is a unique feature that can improve your workflow.
- Affordable API: The $20 plan offers a generous number of weekly queries, making it a cost-effective option for heavy users.
Cons
- Technical Preview: The tool is still in development, so you might encounter some bugs or missing features.
- Limited OS Support: Currently, it only supports macOS and Linux, with Windows support coming soon.
Alternatives
- OpenAI Codex: An AI agent from OpenAI that translates natural language into code. It’s the model that originally powered the first version of GitHub Copilot and can be integrated into IDEs and the terminal.
- Claude Code: An agentic coding tool from Anthropic that lives in your terminal. It is designed to understand your codebase, handle git workflows, and execute routine tasks through natural language commands.
- Gemini CLI: An open-source AI agent from Google that brings the Gemini models directly into your terminal. It offers a generous free tier and integrates with Gemini Code Assist.
Related Resources
- Agent Client Protocol Documentation: Complete specification for the ACP standard that Kimi CLI implements, useful for understanding how the editor integrations work.
- Kimi K2 Model Documentation: Technical details about the underlying Kimi K2 model, including benchmark results, architecture information, and training methodology.
- UV Package Manager Guide: Installation and usage documentation for UV, the recommended tool for installing and managing Kimi CLI.
- Zed Editor External Agents Guide: Instructions for configuring ACP-compatible agents in Zed, including detailed setup steps for Kimi CLI integration.
- Model Context Protocol Servers: Repository of MCP server implementations that you can connect to Kimi CLI for extended tool capabilities.
- Best CLI AI Coding Agents (Open Source)
FAQs
Q: Can I use Kimi CLI without a paid subscription?
A: You need either a Kimi coding plan subscription or access to the Moonshot general API. The CLI tool itself is free and open source, but it requires an API key to function. The coding plan starts at $20 per month and provides approximately 248 queries per week. You can’t use the CLI without some form of API access to the Kimi models.
Q: What happens to my context when I switch between shell mode and agent mode?
A: The agent’s context persists across mode switches. When you switch to shell mode, you’re just changing what the interface does with your input (executing it as a shell command versus sending it to the AI). The agent still remembers previous conversations and code it was working on. You can use the /compact command to summarize and compress context if it gets too large, or /clear to start fresh.
Q: Is there a limit to how much code Kimi CLI can process at once?
A: The underlying Kimi K2 model supports a 128,000 token context window, which translates to processing large codebases and extensive documentation. That’s the technical limit of what the model can handle in memory. The practical limit depends more on your weekly query quota from your subscription plan. Each interaction counts against your limit, so very long conversations with massive context will consume your quota faster than shorter, focused sessions.
Changelog
v1.2 (01/27/2026)
- Renamed to Kimi Code CLI