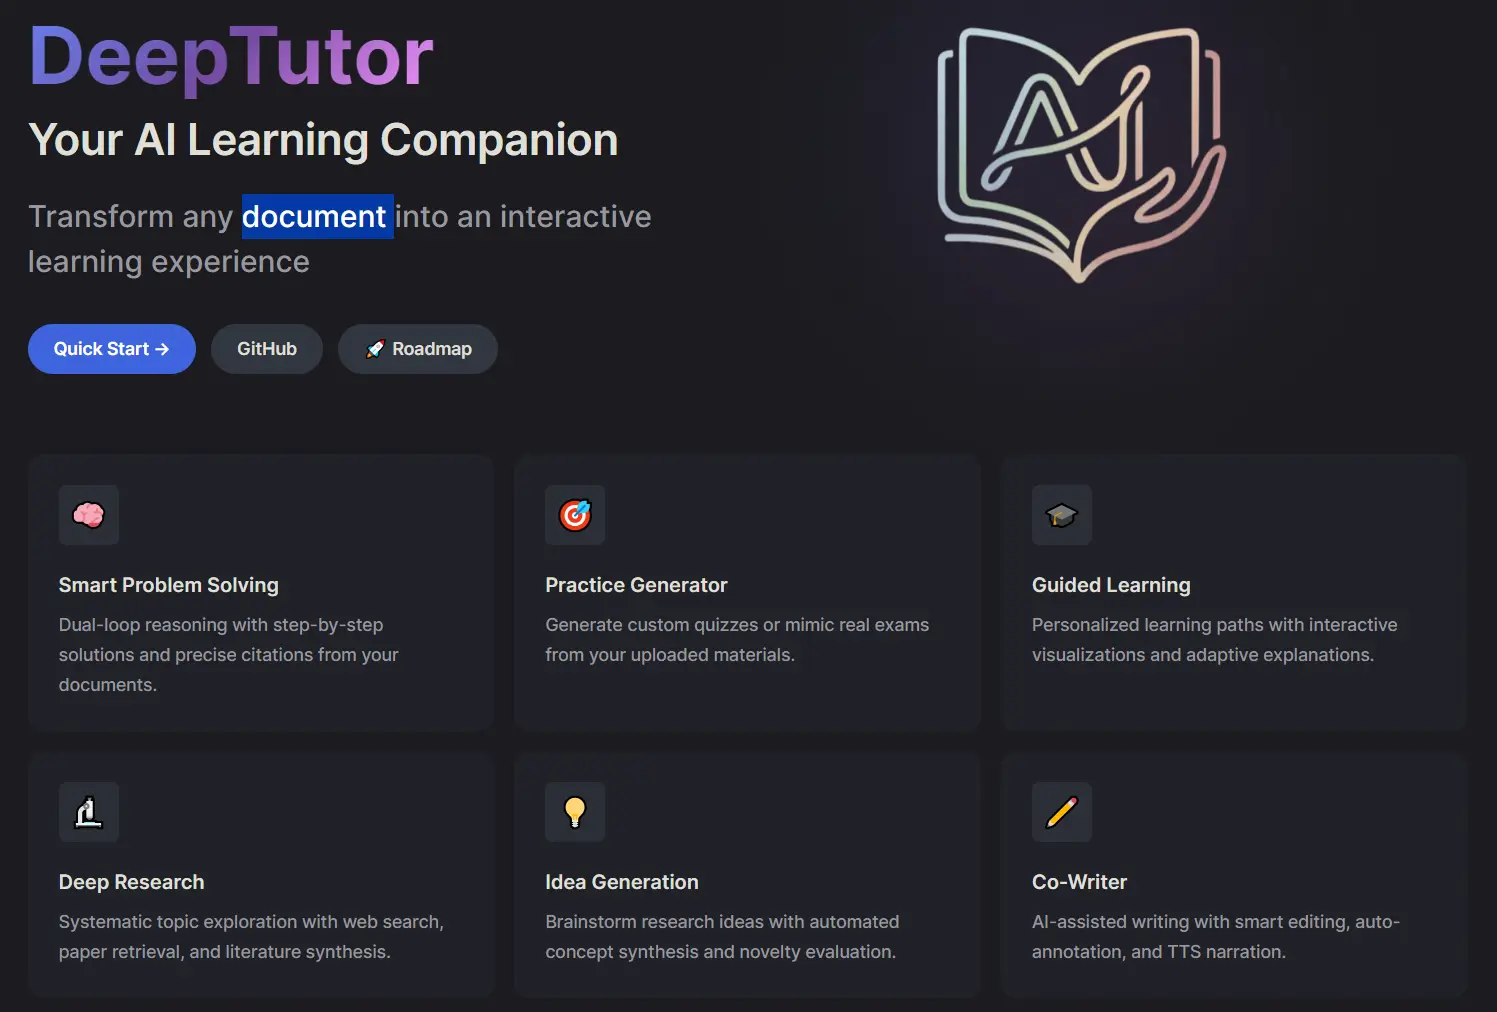
DeepTutor is an open-source, self-hosted AI learning assistant that converts textbooks, research papers, and technical documents into interactive educational experiences.
This tool gained over 8,000 GitHub stars shortly after its release because it addresses a common issue in AI learning tools: the lack of structured, verifiable citations and personalized practice.
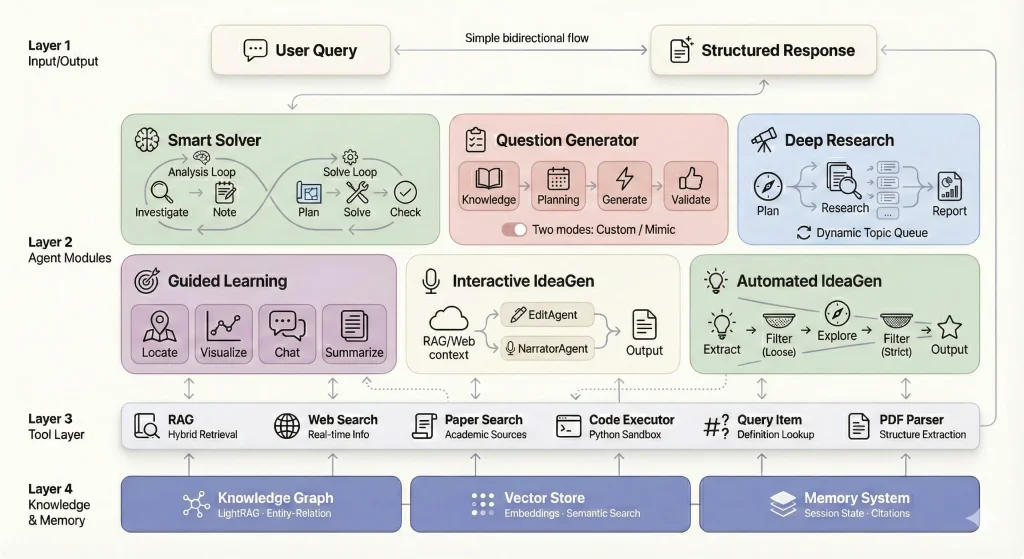
DeepTutor builds a complete knowledge repository from uploaded materials and uses multi-agent architecture to deliver step-by-step solutions, generate practice problems, create visual explanations, and conduct deep research on any topic within your documents.
Upload your course materials once and get an AI tutor that understands the specific content you need to master.
Features
Massive Document Knowledge Q&A: Upload textbooks, research papers, and technical manuals to build an AI-powered knowledge base. The dual-loop reasoning architecture combines RAG retrieval, web search, and code execution to deliver solutions with precise citations to source materials.
Interactive Learning Visualization: Complex concepts get transformed into visual aids, step-by-step breakdowns, and interactive demonstrations. The system adapts conversations based on your learning progress and maintains session-based knowledge tracking.
Knowledge Reinforcement Through Practice: Generate targeted quizzes and practice problems calibrated to your current knowledge level. Upload reference exams to create practice questions that match the original format, style, and difficulty level.
Deep Research & Literature Review: Conduct systematic topic exploration with pattern identification and cross-domain knowledge synthesis. The system identifies knowledge gaps and generates structured learning materials from existing research findings.
Knowledge Graph Foundation: Entity-relation mapping creates semantic connections for intelligent content retrieval. The vector store uses embedding-based search while the memory system tracks citations and maintains contextual continuity.
Multi-Agent Problem Solving: Analysis Loop agents investigate problems and take notes. Solve Loop agents plan approaches, manage execution, solve problems, check solutions, and format outputs. Each agent specializes in specific reasoning tasks.
Custom Assessment Generation: Create questions from scratch based on topic requirements and difficulty preferences. The system analyzes background knowledge, plans question distribution, generates questions, and validates relevance without rejection logic.
Exam Paper Mimicking: Upload PDF exams for automatic parsing and question extraction. The system analyzes structure and generates new questions that match the original exam’s format and difficulty.
Guided Learning Paths: Select notebook records to generate progressive learning plans. Agents identify core knowledge points, convert them to visual HTML pages, provide context-aware Q&A, and generate learning summaries.
Interactive Document Editing: The Markdown editor includes AI-assisted rewriting, content expansion, compression, and auto-annotation. Generate narrated scripts with text-to-speech audio in multiple voices.
Automated Research Ideas: Extract knowledge points from notebook records and generate research ideas through multi-stage filtering. The system explores innovative thinking from multiple dimensions.
Use Cases
Exam Preparation: Upload past exams and course materials to generate practice problems that mirror actual test questions. The system maintains difficulty levels and question styles from reference materials while creating entirely new problems. Students preparing for midterms or finals can practice with questions that feel authentic to their specific course.
Technical Documentation Study: Load programming manuals, API documentation, or framework guides into the knowledge base. Ask specific implementation questions and receive answers with code execution capabilities. The system runs Python code to demonstrate concepts and validates solutions in real-time.
Research Paper Analysis: Build a knowledge base from academic papers in your field. The deep research module conducts systematic literature reviews, identifies patterns across papers, and discovers knowledge gaps. Graduate students can use this to map existing research before starting their own projects.
Self-Paced Course Creation: Transform textbooks into interactive learning sessions with automatically generated knowledge points and visual explanations. The guided learning module creates progressive paths through material. Independent learners can structure their study of complex subjects like machine learning or quantum physics.
Collaborative Note Taking: Use notebooks to aggregate content from different modules. Add problem solutions, generated questions, research reports, and edited documents to personal knowledge bases. Study groups can build shared reference materials that grow throughout a semester.
How to Use DeepTutor
Installation
1. Get the source code from DeepTutor’s GitHub repo.
git clone https://github.com/HKUDS/DeepTutor.git
cd DeepTutor
2. Set up your API keys for the tool to function. Copy the example configuration file:
cp .env.example .envOpen the .env file in a text editor. You need to fill in the following required fields:
# ============================================================================
# Deep-Tutor Environment Configuration
# ============================================================================
# Copy this file to .env and fill in your API keys and settings.
# All API keys should be kept confidential and never committed to version control.
# You can adjust the max_token parameters in DeepTutor/config/agents.yaml.
# ============================================================================

# ============================================================================
# Server Configuration
# ============================================================================
# Configure the server ports and API URL for remote access.

# Backend API port (default: 8001)
# BACKEND_PORT=8001

# Frontend web port (default: 3782)
# FRONTEND_PORT=3782

# Frontend API Base URL (for remote/LAN access)
# Set this when accessing DeepTutor from another device on your network.
# Example: If your server IP is 192.168.1.100, set:
#   NEXT_PUBLIC_API_BASE=http://192.168.1.100:8001
# If not set, defaults to http://localhost:8001 (only works on the local machine)

# NEXT_PUBLIC_API_BASE=http://your-server-ip:8001 (optional)

# ============================================================================
# LLM Deployment Mode Configuration
# ============================================================================
# Control how DeepTutor selects LLM providers.
#
# Options:
#   - hybrid (default): Use both API and Local providers. Active provider takes priority.
#   - api: Only use cloud API providers (OpenAI, Anthropic, DeepSeek, etc.)
#   - local: Only use local/self-hosted providers (Ollama, LM Studio, vLLM, etc.)
#
# In hybrid mode, you can add both API and local providers via the Settings UI,
# and switch between them by setting one as "active".

LLM_MODE=hybrid

# ============================================================================
# LLM (Large Language Model) Configuration
# ============================================================================
# Configure the main AI model used for reasoning, generation, and conversation.
# Supports OpenAI-compatible APIs (OpenAI, Azure OpenAI, DeepSeek, Qwen, etc.)
# and local servers (Ollama, LM Studio, vLLM, llama.cpp).
#
# Note: These environment variables serve as the default/fallback configuration.
# You can also add providers via the Settings UI, which takes priority when active.

# LLM service provider type
# Options: openai, azure_openai, ollama, anthropic
LLM_BINDING=openai

# Model name for the LLM
# Cloud examples: gpt-4o, gpt-4o-mini, deepseek-chat, claude-3-5-sonnet-20241022
# Local examples: llama3.2, qwen2.5, mistral-nemo, deepseek-r1
LLM_MODEL=

# LLM API endpoint URL
# Cloud examples:
#   - OpenAI: https://api.openai.com/v1
#   - DeepSeek: https://api.deepseek.com
#   - Anthropic: https://api.anthropic.com/v1
# Local examples:
#   - Ollama: http://localhost:11434/v1
#   - LM Studio: http://localhost:1234/v1
#   - vLLM: http://localhost:8000/v1
#   - llama.cpp: http://localhost:8080/v1
LLM_HOST=

# LLM API authentication key
# Required for cloud APIs, optional for local deployment
# For Ollama, you can use any string (e.g., "ollama")
LLM_API_KEY=

# Disable SSL certificate verification (set 'true' for self-signed certificates)
DISABLE_SSL_VERIFY=false

# ============================================================================
# Embedding Model Configuration
# ============================================================================
# Configure the text embedding model used for semantic search and RAG.
# Required for knowledge base functionality.

# Embedding service provider type
# Options: openai, azure_openai, ollama, lollms
EMBEDDING_BINDING=openai

# Embedding model name
# Cloud examples: text-embedding-3-large, text-embedding-3-small, text-embedding-ada-002
# Local examples (Ollama): nomic-embed-text, mxbai-embed-large
EMBEDDING_MODEL=text-embedding-3-large

# Embedding vector dimension
# text-embedding-3-large: 3072
# text-embedding-3-small: 1536
# nomic-embed-text: 768
# mxbai-embed-large: 1024
EMBEDDING_DIMENSION=3072

# Embedding API endpoint URL
# Cloud: https://api.openai.com/v1
# Local (Ollama): http://localhost:11434
EMBEDDING_HOST=

# Embedding API authentication key
# Required for cloud providers, not needed for Ollama
EMBEDDING_API_KEY=

# ============================================================================
# TTS (Text-to-Speech) Configuration (Optional)
# ============================================================================
# Configure voice synthesis for the Co-Writer (Interactive IdeaGen) narration feature.
# Also remember to choose a voice in DeepTutor/config/main.yaml.

# TTS model name (e.g., tts-1, tts-1-hd)
TTS_MODEL=

# TTS API endpoint URL (e.g., https://api.openai.com/v1)
TTS_URL=

# TTS API authentication key
TTS_API_KEY=

# ============================================================================
# Web Search Configuration
# ============================================================================
# Configure external search APIs for research features.

# Search provider to use for web search
# Options: perplexity, baidu
# Default: perplexity
SEARCH_PROVIDER=perplexity

# ----------------------------------------------------------------------------
# Perplexity AI Search Configuration
# ----------------------------------------------------------------------------
# Perplexity API key for web search functionality
# Get your API key at: https://www.perplexity.ai/settings/api
PERPLEXITY_API_KEY=

# ----------------------------------------------------------------------------
# Baidu AI Search Configuration (百度AI搜索)
# ----------------------------------------------------------------------------
# Baidu API Key for intelligent search and generation
# Get your API key at: https://console.bce.baidu.com/ai_apaas/resource
# Format: bce-v3/ALTAK-xxx/xxx or the full API key
BAIDU_API_KEY=

# ============================================================================
# Logging Configuration
# ============================================================================

# Log level for RAG tool module
# Options: DEBUG, INFO, WARNING, ERROR
RAG_TOOL_MODULE_LOG_LEVEL=INFO
3. Install Docker and Docker Compose on your system. Run this command to start the application.
docker compose up --build -dThe first run might take 5-10 minutes to build the images.
4. Access the frontend at http://localhost:3782 and API documentation at http://localhost:8001/docs.
Creating Knowledge Bases
1. Visit http://localhost:3782/knowledge after services start. Click “New Knowledge Base” and enter a name describing your content.
2. Upload PDF, TXT, or MD files containing your study materials. The system processes documents in the background and shows progress in the terminal.
3. Demo knowledge bases are available from Google Drive containing research papers or textbook chapters. Extract these into the data/ directory to test features immediately.
Solving Problems
1. Visit to http://localhost:3782/solver and select your knowledge base.
2. Enter a question or problem in the text field. Click “Solve” to start the dual-loop reasoning process. The Analysis Loop investigates the problem and takes notes. The Solve Loop plans the approach, executes solution steps, checks the answer, and formats output.
3. Watch real-time streaming of the reasoning process. Results save to data/user/solve/solve_YYYYMMDD_HHMMSS/ with investigation memory, solution chain, citations, and final answer in Markdown.
Generating Questions
1. Visit http://localhost:3782/question for custom question generation. Fill in topic requirements, difficulty level, question type, and count.
2. Click “Generate Questions” to start the process. The system analyzes background knowledge, plans question distribution, generates questions, and validates relevance.
3. Switch to “Mimic Exam” tab to upload reference PDFs. The system parses the exam, extracts questions, and generates new problems matching the original style.
4. Outputs save to timestamped folders in data/user/question/.
Conducting Research
1. Visit http://localhost:3782/research and enter your research topic.
2. Select a preset mode (quick for 1-2 subtopics, medium for 5 subtopics, deep for 8 subtopics, or auto for agent-determined depth). The system executes planning, researching, and reporting phases.
3. Parallel execution mode processes multiple topics concurrently with up to 5 simultaneous tasks. Watch real-time progress updates.
4. The final report includes clickable inline citations, three-level outline structure, and a references section. Export reports as Markdown or PDF.
Guided Learning
1. Visit http://localhost:3782/guide and select one or more notebooks.
2. Click “Generate Learning Plan” to have the LocateAgent identify 3-5 core knowledge points. Start learning to generate interactive HTML pages for each concept.
3. Ask questions during learning sessions and receive context-aware answers.
4. Click “Next” to proceed through the learning path. Complete learning to generate a summary.
5. Session state saves to data/user/guide/session_{session_id}.json.
Interactive Editing
1. Visit http://localhost:3782/co_writer and enter or paste text.
2. Use the Rewrite feature with custom instructions and optional RAG or web context.
3. Use Shorten to compress content while preserving key information.
4. Use Expand to add details and context. Click Auto Mark to identify and highlight key content automatically.
5. Use Narrate to generate scripts and TTS audio in multiple voices.
6. Export finished documents to Markdown or PDF formats.
Remote Access Configuration
1. Set NEXT_PUBLIC_API_BASE in the .env file for LAN access. Use your server’s IP address like http://192.168.1.100:8001.
2. For cloud deployment, set NEXT_PUBLIC_API_BASE_EXTERNAL with your public URL. Docker deployments need this environment variable passed with the -e flag.
3. Custom ports require setting both BACKEND_PORT and FRONTEND_PORT plus matching port mappings in Docker run commands.
Pros
- Data Privacy: You store all documents and user data locally in the
data/directory. - Verifiable Accuracy: The tool provides precise citations for every claim it makes.
- Multi-Modal Output: DeepTutor generates text, code, visual HTML pages, and even audio.
- Flexible Deployment: You can run it on Windows, macOS (including Apple Silicon), or Linux.
Cons
- Technical Barrier: The setup process requires familiarity with terminal commands and API keys.
- API Costs: You must pay for the underlying LLM tokens (OpenAI, etc.), which can add up during deep research tasks.
- Resource Intensive: Running the Docker containers requires a decent amount of RAM and CPU power.
Related Resources
- LightRAG: Fast and efficient Retrieval-Augmented Generation framework that DeepTutor builds upon for knowledge base operations.
- AI-Researcher: Research automation tool from the same lab that inspired DeepTutor’s deep research module architecture.
- RAG-Anything: Multimodal RAG system for handling diverse content types beyond text documents.
- Docker Documentation: Official installation and usage guides for containerized deployment options.
FAQs
Q: Does DeepTutor work offline?
A: The application logic runs locally on your machine. However, the default configuration relies on external APIs (like OpenAI) for intelligence, so you need an internet connection. You can configure it to point to a local LLM server if you have the hardware to support it.
Q: How does the dual-loop architecture improve problem solving compared to single-pass approaches?
A: The Analysis Loop (InvestigateAgent and NoteAgent) separates problem understanding from solution execution. Traditional single-pass systems try to solve problems immediately, which fails when key context is missing. DeepTutor’s InvestigateAgent first gathers relevant information through RAG queries, web searches, or document lookups. The NoteAgent compresses findings into actionable insights. Only then does the Solve Loop (PlanAgent, ManagerAgent, SolveAgent, CheckAgent) begin work with complete context. This separation reduces hallucination and improves citation accuracy. The CheckAgent validates solutions before formatting, catching errors that single-pass systems would miss.
Q: What happens to my data?
A: All content stays in the local data/ directory on your machine or server. Knowledge bases, problem solutions, research reports, notebooks, and generated questions save as JSON and Markdown files with timestamps. The system never sends your documents to external services except when making LLM API calls (which is necessary for operation).
Q: Can I add documents to existing knowledge bases without rebuilding everything?
A: Yes, use the incremental document addition feature. Run python -m src.knowledge.add_documents <kb_name> --docs <new_document.pdf> from the command line. The system processes only the new document and merges its content into the existing knowledge graph and vector store.
Q: How accurate is the exam mimic mode compared to actual test questions?
A: Accuracy depends on PDF parsing success and the clarity of patterns in your reference exam. The system analyzes question structure, difficulty indicators, answer formats, and distractor patterns. It generates problems that match these characteristics but cannot perfectly replicate nuanced aspects like specific professor preferences or unstated grading rubrics.
Q: What should I do when parallel research mode fails midway?
A: Parallel mode failures usually come from concurrent API rate limits or memory exhaustion. Check data/user/research/cache/research_YYYYMMDD_HHMMSS/researching_progress.json to see which topics completed. The system saves partial results, so you can review completed research blocks. Reduce max_parallel_topics in config/main.yaml from 5 to 2 or 3.