LangExtract is an open-source Python library developed by Google that uses LLMs (like Gemini) to pull structured information from unstructured text.
It’s helpful for developers and data scientists who need to turn messy documents, like clinical notes, legal contracts, or even entire books, into clean, organized data.
Features
- Structured output schema: LangExtract enforces consistent output formats based on your few-shot examples, so you always get predictable results regardless of input variations.
- Exact source mapping: Every extracted piece of information links directly back to its location in the original text, making verification straightforward.
- Long document optimization: The library handles large texts through smart chunking, parallel processing, and multiple extraction passes to catch everything.
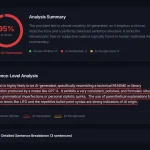
- Interactive visualization: Generate HTML files that show extracted entities highlighted in their original context—perfect for reviewing hundreds of extractions at once.
- Multiple model support: Works with Google’s Gemini models out of the box and integrates with local models via Ollama for offline use.
- Domain flexibility: Adapt to any extraction task with just a few examples—no model fine-tuning required.
- LLM knowledge integration: Control how much the extraction relies on the model’s world knowledge versus strict text evidence through your prompt design.
See It In Action

Use Cases
- Clinical Documentation Processing: Extract medication names, dosages, administration routes, and patient conditions from clinical notes and discharge summaries. Healthcare professionals can structure thousands of patient records while maintaining audit trails to source documents.
- Literary Analysis and Research: Extract characters, emotions, relationships, and themes from novels, plays, and manuscripts. Academic researchers can process entire literary works to identify patterns and analyze narrative structures systematically.
- Legal Document Review: Structure contracts, case files, and legal briefs by extracting key entities like dates, parties, obligations, and precedents. Legal teams can accelerate document review processes while maintaining precise source references.
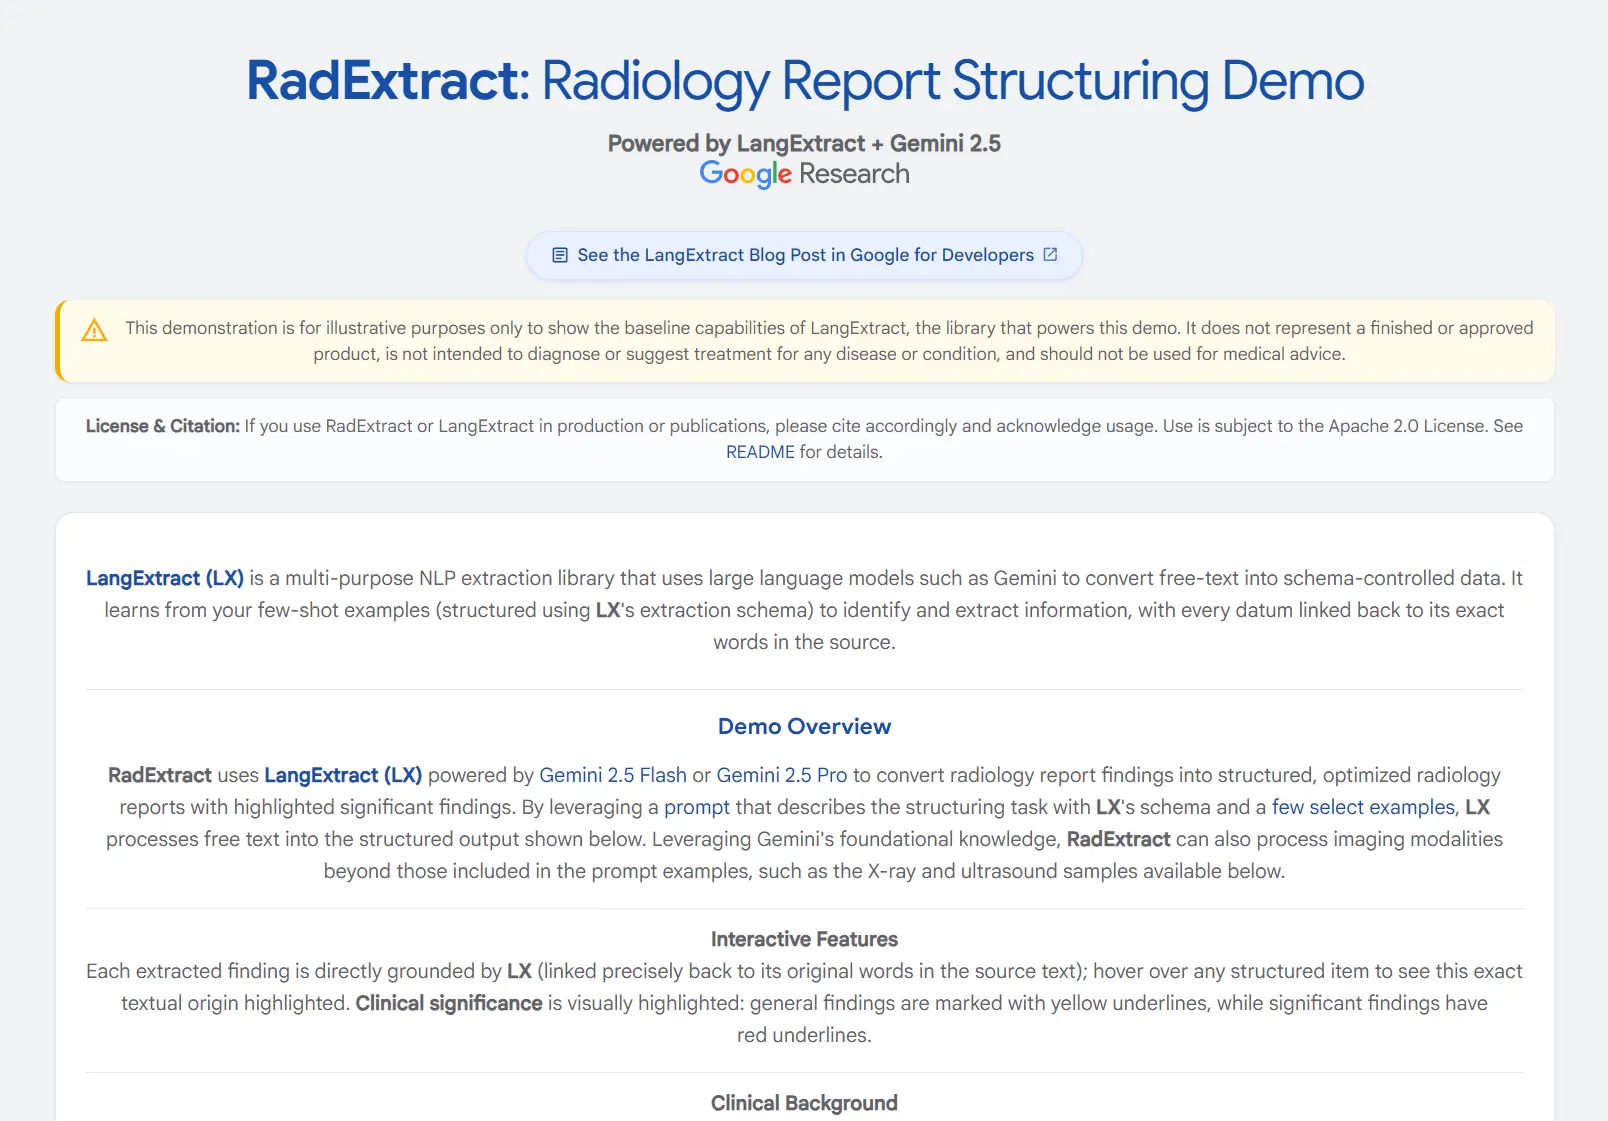
- Radiology Report Structuring: Convert free-text radiology reports into structured formats for database storage and analysis. Medical institutions can standardize reporting formats across different radiologists and time periods.
- Business Intelligence from Reports: Extract key performance indicators, financial metrics, and strategic insights from quarterly reports, market analyses, and business documents. Analysts can quickly structure data from hundreds of reports for trend analysis.
Installation
You can either install LangExtract from the Python Package Index (PyPI) or install it from the source code if you want to work with the latest development version.
Standard Installation from PyPI
For most use cases, a simple pip install is all you need. I recommend setting up a Python virtual environment first to avoid conflicts with other packages on your system.
1. Create and Activate a Virtual Environment (Optional but Recommended)
On macOS or Linux:
# Create a virtual environment named 'env'
python3 -m venv env
# Activate it
source env/bin/activate
On Windows:
# Create a virtual environment named 'env'
python -m venv env
# Activate it
.\env\Scripts\activate
2. Install LangExtract.
pip install langextractInstallation from Source (For Developers)
If you plan to contribute to LangExtract or want to experiment with features that haven’t been officially released yet, you should install it from its GitHub repository.
1. Clone the project’s source code to your local machine using Git.
git clone https://github.com/google/langextract.git
cd langextract
2. Using the -e flag installs the package in “editable” mode. This means any changes you make to the source files are immediately reflected when you run the code, without needing to reinstall.
There are a few options depending on your needs:
- Basic use: This installs only the core dependencies.
pip install -e .- For development: This includes extra tools for code linting and formatting.
pip install -e ".[dev]"- For running tests: This includes
pytestand other testing dependencies.
pip install -e ".[test]"Usage
Using LangExtract boils down to a three-step process: define your task, run the extraction, and visualize the results. The core of the library is the lx.extract function, which orchestrates everything.
Define Your Extraction Task
The quality of your output depends almost entirely on how clearly you define what you want. You do this with two things: a prompt description and a list of examples.
1. Write a prompt_description. This is a high-level instruction for the LLM. Think of it as the general order you’re giving. It should be clear and concise.
import langextract as lx
import textwrap
# The prompt tells the LLM its main goal.
prompt = textwrap.dedent("""\
    Extract characters, emotions, and relationships in order of appearance.
    Use exact text for extractions. Do not paraphrase or overlap entities.
    Provide meaningful attributes for each entity to add context.""")
2. Provide examples. LangExtract uses a few-shot learning approach. This means it learns the structure of the data you want from the examples you provide. A single, high-quality example is often enough.
Each example consists of a sample text and a list of extractions you would expect to get from that text. You define these using lx.data.ExampleData and lx.data.Extraction. This is how you show the model exactly what the output JSON structure should look like.
My advice is to be as specific as possible here. Notice in the example below how the extraction_text matches the source text exactly. The attributes add context that the LLM can either find in the text or infer.
# The example shows the LLM exactly what kind of output you want.
examples = [
    lx.data.ExampleData(
        text="ROMEO. But soft! What light through yonder window breaks? It is the east, and Juliet is the sun.",
        extractions=[
            lx.data.Extraction(
                extraction_class="character",
                extraction_text="ROMEO",
                attributes={"emotional_state": "wonder"}
            ),
            lx.data.Extraction(
                extraction_class="emotion",
                extraction_text="But soft!",
                attributes={"feeling": "gentle awe"}
            ),
            lx.data.Extraction(
                extraction_class="relationship",
                extraction_text="Juliet is the sun",
                attributes={"type": "metaphor"}
            ),
        ]
    )
]
Run the Extraction
With your prompt and examples ready, you call the lx.extract function. You feed it your input text, the prompt materials, and specify a model.
# The input text to be processed
input_text = "Lady Juliet gazed longingly at the stars, her heart aching for Romeo"
# Run the extraction function
result = lx.extract(
    text_or_documents=input_text,
    prompt_description=prompt,
    examples=examples,
    model_id="gemini-1.5-flash",
)
The model_id is important. The default, gemini-1.5-flash, is a great choice for its balance of speed and quality. For more complex tasks that require deeper reasoning, gemini-1.5-pro might give you better results, though it will be slower and cost more. I usually start with flash and only switch to pro if I’m not getting the quality I need.
Step 3: Visualize the Results
The result object you get back contains the extracted data. The best way to review it is by creating the interactive HTML visualization. This has been a huge help for me in debugging my prompts. When an extraction is missed or incorrect, seeing it (or not seeing it) highlighted in the original text makes it obvious what went wrong.
1. Save the results to a .jsonl file. This format is common in machine learning and consists of one JSON object per line.
# Save the results to a JSONL file
lx.io.save_annotated_documents([result], output_name="extraction_results.jsonl")
2. Generate the HTML file from that saved data.
# Generate the visualization from the file
html_content = lx.visualize("extraction_results.jsonl")
with open("visualization.html", "w") as f:
    f.write(html_content)
3. Opening visualization.html in your browser will show you an interactive view of your original text with all the extracted entities highlighted.
Advanced Usage
LangExtract’s real power comes out when you work with large texts. You can pass a URL directly to the text_or_documents parameter. To handle the size, you can adjust a few key parameters to optimize performance and accuracy.
max_workers: This sets the number of parallel processes to run. A higher number (e.g., 20) can dramatically speed up extraction on long documents by making multiple API calls at once.extraction_passes: Setting this to a number greater than one (e.g., 3) makes the library go over the text multiple times. This improves recall, helping to find entities that might have been missed on the first pass.max_char_buffer: This controls the size of the text chunks sent to the LLM. Smaller chunks can sometimes improve accuracy, as the model has a more focused context to work with.
Here’s how you would apply this to the full text of Romeo and Juliet.
# Process an entire book directly from a URL
full_text_result = lx.extract(
    text_or_documents="https://www.gutenberg.org/files/1513/1513-0.txt",
    prompt_description=prompt,
    examples=examples,
    model_id="gemini-1.5-flash",
    extraction_passes=3,    # Improves recall
    max_workers=20,         # Speeds up processing
    max_char_buffer=1000    # Focuses the model on smaller contexts
)
# Save and visualize the same way
lx.io.save_annotated_documents([full_text_result], "full_play_results.jsonl")
html_content = lx.visualize("full_play_results.jsonl")
with open("full_play_visualization.html", "w") as f:
    f.write(html_content)
API Key Setup
If you plan to use LangExtract with a cloud-hosted LLM like Google’s Gemini family, you need an API key.
Note that if you’re using a local model running through Ollama, you can skip this entire process. The library’s built-in Ollama support works without needing a key.
Where to Get an API Key
You have two primary sources for a Gemini API key:
- Google AI Studio: This is the best place for most developers, individual users, and for getting started quickly. You can generate a free key in just a few clicks.
- Vertex AI: For enterprise-level applications that require more robust governance, specific regions, or access to a broader suite of Google Cloud services, you’ll get your key through a Vertex AI project.
Setting Up Your Key
LangExtract offers a few ways to provide your API key. I strongly recommend using a .env file for most projects.
Option 1: Environment Variable (A Solid Choice)
You can set the API key as an environment variable in your terminal session. LangExtract will automatically detect and use it.
On macOS or Linux:
export LANGEXTRACT_API_KEY="your-api-key-here"On Windows, you can set it for the current command prompt session:
set LANGEXTRACT_API_KEY="your-api-key-here"Or you can set it permanently through the System Properties window.
The main downside here is that you have to remember to set the variable every time you open a new terminal session, unless you add it to your shell’s startup file (like .zshrc or .bash_profile).
Option 2: .env File (Recommended for Development)
This is my preferred method for any development project. It’s clean, secure, and portable. You create a file named .env in the root directory of your project.
1. Create and populate the .env file.
echo "LANGEXTRACT_API_KEY=your-api-key-here" > .env2. Add .env to your .gitignore file. It prevents you from accidentally committing your secret API key to a public Git repository. If you don’t have a .gitignore file, create one.
echo ".env" >> .gitignoreWith this setup, LangExtract automatically finds and loads the key from the .env file when you run your Python script. No extra code needed.
Option 3: Pass the Key Directly in Code (Not Recommended)
You can also pass the API key directly as an argument to the lx.extract function.
result = lx.extract(
text_or_documents=input_text,
prompt_description="Extract information...",
examples=[...],
model_id="gemini-1.5-flash",
api_key="your-api-key-here"  # Only for quick tests!
)
I only do this for a quick, throwaway script or a temporary test. You should avoid hardcoding secrets like this in any real project. It’s a security risk and makes it a pain to manage your keys later on.
Pros
- Source Grounding is a Lifesaver: Knowing exactly where the LLM found a piece of information removes the guesswork and makes the output trustworthy.
- Excellent for Long Texts: The built-in chunking and parallel processing finally make it practical to analyze entire books or lengthy reports without custom code.
- The Visualizer is Incredibly Useful: The interactive HTML output is fantastic for reviewing results and demonstrating the value of the extraction to others.
- Flexible Model Support: You are not locked into a single LLM provider; you can use Gemini, or local models with Ollama.
- Easy to Get Started: The few-shot approach is much simpler and cheaper than fine-tuning a dedicated model.
Cons
- Requires an LLM API: While the library is free, using cloud models like Gemini incurs API costs.
- Quality Depends on Your Prompt: The results are only as good as your instructions and examples. Crafting effective prompts takes some practice.
Related Resources
- RadExtract Demo: HuggingFace Spaces Demo offers a live interactive demonstration of radiology report structuring capabilities.
- Google AI Studio: AI Studio API Keys for obtaining Gemini API access required for cloud-based processing.
- Ollama Integration Guide: Ollama Official Site for setting up local LLM processing when privacy or cost considerations make cloud processing unsuitable.
- Python Virtual Environments: Python venv Documentation for proper isolation of LangExtract installations and dependencies.
FAQs
Q: What types of documents work best with LangExtract?
A: LangExtract performs well on any text document where you can clearly define what you want to extract. Clinical notes, research papers, legal documents, and literary texts all work well. The key is having clear examples of the extraction patterns you want.
Q: Can I use LangExtract without cloud API costs?
A: Yes, through the built-in Ollama integration you can run local models without API costs. However, local models typically provide lower accuracy than cloud-based options like Gemini. For production applications, I recommend testing with cloud models first to establish baseline accuracy, then evaluating whether local models meet your quality requirements.
Q: How does LangExtract handle documents in languages other than English?
A: LangExtract’s language support depends on the underlying LLM you choose. Gemini models support many languages, so you can extract from documents in Spanish, French, German, and other major languages by providing examples in the target language.
Q: What happens to my documents when using cloud models?
A: When using cloud-based models, your text is sent to the model provider’s servers for processing. LangExtract itself doesn’t store your documents, but you should review the privacy policies of your chosen model provider. For sensitive documents, consider using local models through Ollama integration to keep all processing on your own systems.