Localization CLI is a free command-line tool that auto-translates iOS localization files through multiple AI providers.
It currently supports over 70 languages and allows iOS developers to translate their entire app interface in minutes instead of hours.
Features
- Multiple AI Providers: Choose from Gemini, ChatGPT, Claude, DeepSeek, Perplexity, or Grok based on your API access and preferences.
- 70+ Language: Supports French, German, Spanish, Italian, Portuguese, Turkish, Chinese, Japanese, Korean, Arabic, Russian, and dozens more languages.
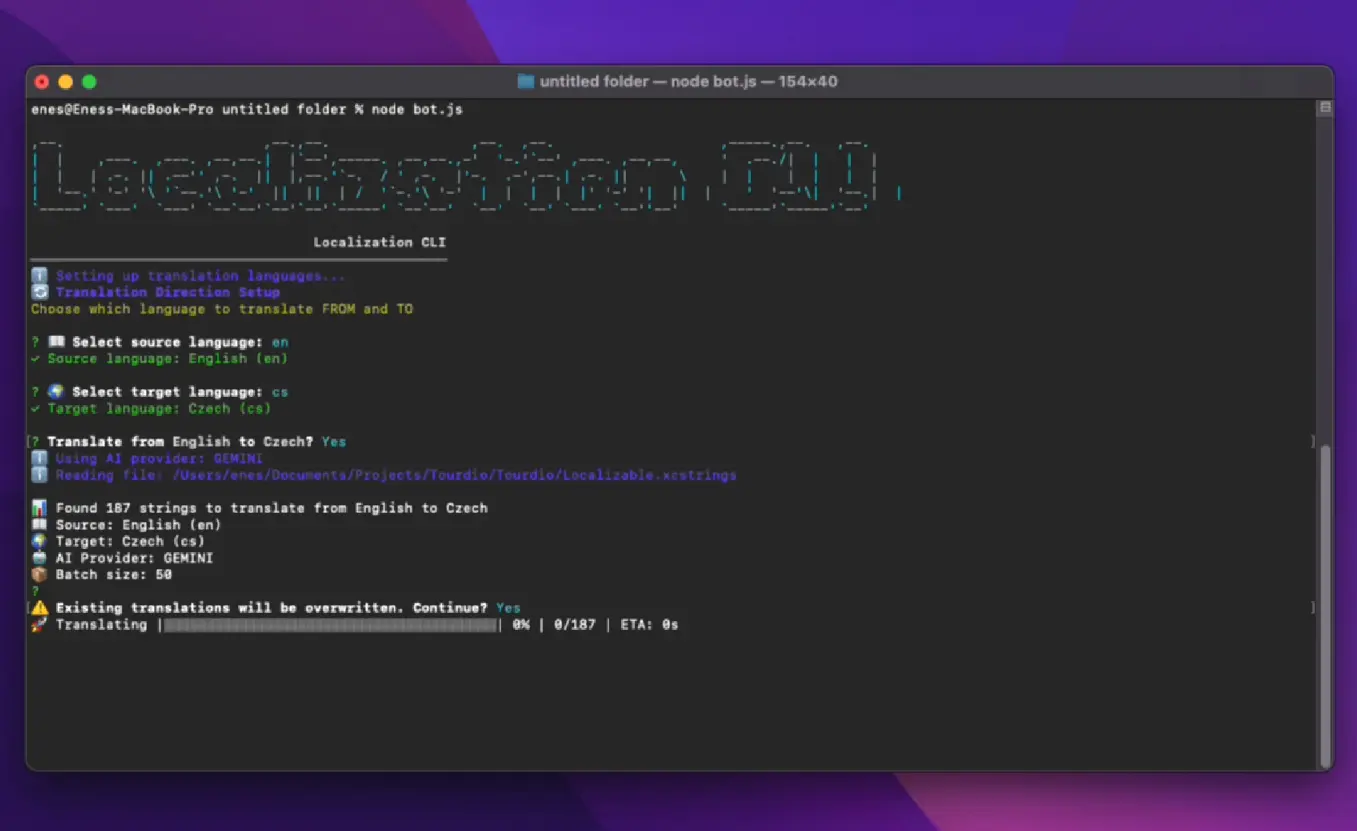
- Interactive CLI: Displays beautiful progress bars, colorful output, and user-friendly prompts that show exactly what’s happening during translation.
- Smart Application Context: You can tell the AI what type of app you’re building (travel, fitness, e-commerce) so it picks domain-appropriate terminology.
- Auto-Retry Mechanism: Failed translation chunks get automatically retried up to 3 times (configurable) with smart delays to avoid rate limiting.
- Real-time Progress Tracking: Live statistics show you how many strings are translated, failed, or pending during the process.
- Batch Processing: Processes multiple strings at once (1-100 configurable) to speed up large translation jobs.
- Environment Variable Configuration: Set everything up once in a .env file and run translations with a single command.
See It In Action
Use Cases
- Indie App Localization: An individual developer can translate their app into 70+ languages using the free tier of the Google Gemini API.
- Small Development Teams: Teams without a dedicated localization manager can standardize their translation process.
- App Publishers with Multiple Products: A publisher managing several apps can reuse configuration files. They can quickly adapt translations for different app genres by changing the
APP_CONTEXTvariable. - Developers Updating Existing Apps: When adding new features, you only need to translate the new strings.
How To Use It
1. You need a String Catalog file in your iOS project. Open Xcode and right-click your project in the navigator. Select “New File…” and choose “iOS” → “Resource” → “String Catalog”. Name it Localizable and Xcode adds the .xcstrings extension automatically. Add your base language strings (usually English) to this file. Click the “+” button in the bottom left to add target languages. Run a build so Xcode detects and indexes all the strings properly.
2. Right-click your Localizable.xcstrings file in Xcode and select “Show in Finder”. Right-click the file in Finder and select “Get Info”. Copy the full path from the “Where:” section. The path looks like /Users/yourname/Documents/Projects/YourApp/YourApp.
3. Clone the Localization CLI repository and install dependencies:
git clone https://github.com/enesutku/Localization-CLI.git
cd Localization-CLI
npm install
4. Get an API key from the following AI providers:
- Gemini: Get a free API key at ai.google.dev
- OpenAI: Create an account at platform.openai.com
- Claude: Sign up at console.anthropic.com
- DeepSeek: Register at platform.deepseek.com
- Perplexity: Get access at perplexity.ai/api
- Grok: Available through x.ai
5. Copy the example environment file:
cp .env.example .env6. Open the .env file and configure these settings:
# ==========================================
# AI PROVIDER CONFIGURATION
# ==========================================
# Choose which AI service to use for translations
# Options: gemini, openai, claude, deepseek, replicate, perplexity, grok
AI_PROVIDER=gemini
# ==========================================
# API KEYS (Only provide keys for services you want to use)
# ==========================================
# Google Gemini API key
GEMINI_API_KEY=your_gemini_api_key_here
# OpenAI API key
OPENAI_API_KEY=your_openai_api_key_here
# Anthropic Claude API key
CLAUDE_API_KEY=your_claude_api_key_here
# DeepSeek API key
DEEPSEEK_API_KEY=your_deepseek_api_key_here
# Replicate API token
REPLICATE_API_TOKEN=your_replicate_api_token_here
# Perplexity API key
PERPLEXITY_API_KEY=your_perplexity_api_key_here
# Grok API key
GROK_API_KEY=your_grok_api_key_here
# ==========================================
# FILE CONFIGURATION
# ==========================================
# Full path to your iOS xcstrings file
# Example: /Users/username/Projects/MyApp/Localizable.xcstrings
# Leave empty to be prompted when running the bot
XCSTRINGS_FILE_PATH=/path/to/your/Localizable.xcstrings
# ==========================================
# TRANSLATION CONFIGURATION
# ==========================================
# How many strings to translate at once (1-100, larger values are faster but may hit API limits)
BATCH_SIZE=50
# Default target language (used if not specified in command line)
# Supported languages: tr, fr, de, es, it, pt, ru, ar, ja, ko, zh, etc.
DEFAULT_TARGET_LANGUAGE=de
# Default source language (which language to translate from)
# Usually: en (English), tr (Turkish), de (German), etc.
DEFAULT_SOURCE_LANGUAGE=en
# Application context (helps AI understand your app domain for better translations)
# Example: "travel booking app", "fitness tracking app", "e-commerce platform", etc.
# Leave empty to be prompted when running the bot
APP_CONTEXT=
# ==========================================
# ADVANCED SETTINGS
# ==========================================
# Show detailed logs during translation process
VERBOSE_LOGGING=false
# Number of automatic retries on error/failed chunks
RETRY_COUNT=3
# Delay between API requests and retries (milliseconds)
REQUEST_DELAY=1000
7. Execute the translation:
node bot.js8. The CLI prompts you for source and target languages if you didn’t set them in .env. You can also specify languages directly:
# Translate from English to German
node bot.js --source en --target de
# Translate to multiple languages
node bot.js --source en --target de,fr,es,it
9. The tool shows real-time progress with colored output:
✅ Chunk 1 translation successful
✅ Chunk 2 translation successful
⚠️ Chunk 3 failed (attempt 1/3): API rate limit exceeded
ℹ️ Retrying chunk 3 (attempt 2/3)
✅ Chunk 3 translation successful on retry
Translation speed depends on your batch size and API provider. A 500-string app typically translates in 2-5 minutes. The tool saves translations directly to your xcstrings file. You open the file in Xcode afterward and see all translations populated.
Pros
- Cost-Effective: Works with free API tiers (like Gemini).
- Context Aware: Produces higher quality translations than standard Google Translate because it understands what the app does.
- Time Saving: Processes batches of strings simultaneously.
- Developer Friendly: Fits naturally into a git-based workflow and handles JSON/xcstrings structure automatically.
Cons
- Requires API Keys: You must obtain your own API keys from providers.
- No GUI: The tool runs entirely in the terminal.
Related Resources
- Apple’s Localization Guide: Apple’s official documentation covers String Catalogs, localization workflows, and best practices for iOS internationalization.
- Gemini API Documentation: Understand Gemini’s API capabilities, rate limits, and pricing if you choose Google’s AI provider.
- OpenAI API Reference: Explore ChatGPT API features, model options, and cost optimization strategies.
- Anthropic Claude API Docs: Learn about Claude’s API, context windows, and prompt engineering techniques.
FAQs
Q: Can I use this tool with Android projects?
A: No. The tool specifically reads and writes Xcode’s xcstrings format. Android uses XML resource files with a different structure.
Q: Are the translations production-ready?
A: They’re good starting points but not production-ready without review. I’ve found AI translations are 70-85% accurate for common languages like French, German, or Spanish. Technical UI strings translate better than marketing copy. You should always have a native speaker review AI translations before shipping to users.
Q: Can I translate from languages other than English?
A: Yes. The tool supports flexible source languages. Set DEFAULT_SOURCE_LANGUAGE to any language code (en, de, fr, tr, zh, ja, etc.). You can translate Turkish to German, Chinese to English, or any combination.
Q: What happens if translation fails midway through?
A: The tool saves progress as it goes. Each successfully translated chunk writes to your xcstrings file immediately. If something fails, you don’t lose work. The retry mechanism handles most temporary failures. For persistent failures, you can reduce your batch size or switch AI providers.
Q: How do I handle app-specific terminology?
A: Use the APP_CONTEXT feature to give the AI domain knowledge. Set it to something like “fitness tracking app” or “restaurant reservation platform”. This helps the AI pick appropriate terms. For branded terms or unique vocabulary, you’ll need to manually correct translations after the CLI finishes.
Q: Can I use multiple AI providers for the same project?
A: Yes, but you switch providers between runs, not during a run. Change AI_PROVIDER in your .env file and run the tool again. Some developers use Gemini for initial translations, then re-translate problem strings with Claude or ChatGPT. Each provider has different strengths with different language pairs.